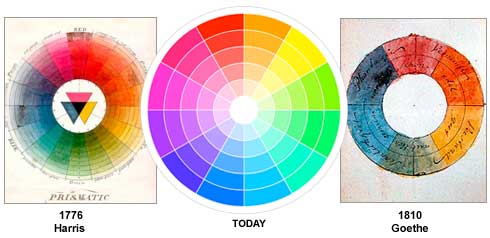
Monday, 23 February 2015

Natural beauty hair

Hair for fashion & beauty

In a practical session we were asked to create a hair style inspired by natural beauty hair. This look was fairly easy to create however i would have loved if I had been able to create the look on a model that had natural texture to the hair.

Tools and products needed to create this look:

  • Water spray
  • Hair dryer with diffuser
  • Hair moose
  • Sea salt spray
How to create this look:

  1. Wet the hair down using water spray and part the hair as desired.
  2. Work moose through the hair evenly and then apply some sea salt spray
  3. Using the hair dryer from the roots of the hair scrunching the hair within the diffuser until the hair is dry.
  4. Style the hair as desired.
Below are the images of what styles I created in the studio. I chose to practice some skills that we have been taught in previous lessons this semester.

Creating a textured cignon with chunky braids


Creating a slip tie knot in textured hair


Creating a waterfall plait in the hair


Thursday, 19 February 2015

Fashion plaits & braids

Hair for fashion and beauty

Wiggle plait

Creating a wiggle plait is the simplest plait I have recently learnt how to create. Below is a step by step of how to create this style of plait:

  1. Create a standard three strand plait
  2. Hold one strand at the bottom of the plait and then push the plait up. 
  3. use a hair tie or a hair grip to old the plait in place.

Five strand plait

Creating a five strand plait really dazzled me at first. It look me a while to get the hang of it, but once you have got your head around the five strands of hair it became really simple! I decided to crimp all the hair as i felt that the texture of the hair would make it easier for me to work with. Below is a step by step of how I created this five strand plait:

  1. Section the hair into five equal size strands.
  2. Begin working with the hair from the right side with one fold of each section - just like the start of a three strand plait.
  3. You should then weave the strand from the left hand side over and then under the strand next to it on the right.
  4. Weave the strand from the right hand side over and then under the left strand.
  5. Repeat this motion until you reach the ends of the hair.
Here is my five strand plait that I created in the studio at uni.


Below is a tutorial I found most helpful on YouTube to visually show the steps of how to create a five strand plait.


Creating of a 5 strand bread in sleek straight hair

Waterfall braid

Below is a step by step of  how to create a waterfall plait in the hair.


  1. Take three stands of hair and begin to create a three strand plait.
  2. When folding the right strand of hair into the middle of the two other strands.
  3. Fold the left hand strand into the middle of the two right hand strands and let this strand fall onto the hair.
  4. You should then take a section from underneath the right section of hair and fold it into the left hand section.
  5. fold the left section into the middle and then release this strand into the hair.
  6. take another section of hair from the underneath of the right section and then fold again into the left hand section.
  7. Repeat this until you reach the end of the hair.
On the right is my first attempt of creating a waterfall plait. I found it difficult as this plait looks like a twist in the hair. Lottie (my hair teacher) said that this was because of my positioning while creating the braid  in the hair. I plan to practice this again and hopefully create a normal looking waterfall braid!

Slip tie knot braid

I created a slip knot braid in the hair going from the top of the head down to the bottom of the neck. you can use this technique to create a slip tie knot in any section of the hair. Below is a step by step of how I created this look:

  1. Take two equal sections of hair from the hair line and tie them in a knot.
  2. Take another two equal sections as the previous sections of hair and tie them in a knot.
  3. Once you have two knotted two sections of hair you should then create a third knot -this time taking the ends of the first knot into this knot. You should ensure that the ends of the first knot and going underneath the the end sections of the second knot.
  4. You should continue these steps until you have used all of the hair - you can then style the end of the hair as desired. I chose to continue knotting the last section and the fold and pin the hair under at the top of the neck so they could not be seen.
Here is an image of my first attempt of creating a slip tie knot in the hair. I found it difficult to keep all the knots neat as the dolls head hair isn't quite long enough.


Wednesday, 11 February 2015

Colour theory


The colour wheel 

The colour wheel is based on the primary colours, which are red, yellow and blue. In 1666 Sir Isaac Newton developed the first colour wheel and it had been developed since then.

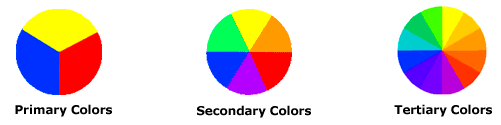
There are then different categories of colour which are shown below:


Primary Colors: Red, yellow and blue
In traditional color theory (used in paint and pigments), primary colors are the 3 pigment colors that can not be mixed or formed by any combination of other colors. All other colors are derived from these 3 hues. 
Secondary Colors: Green, orange and purple
These are the colors formed by mixing the primary colors.

Tertiary Colors: Yellow-orange, red-orange, red-purple, blue-purple, blue-green & yellow-green
These are the colors formed by mixing a primary and a secondary color. That's why the hue is a two word name, such as blue-green, red-violet, and yellow-orange.

Warm and cool colours

The colour circle can be divided into warm and cool colours.

Warm colours are vivid and energetic, and tend to advance in space.


Cool colours give an impression of calm, and create a soothing impression.

White, black and grey are considered to be neutral.


Complementary colour scheme 

Colours that are opposite each other on the colour wheel are considered to be complementary colours (example: red and green).

The high contrast of complementary colours creates a vibrant look especially when used at full saturation. This colour scheme must be managed well so it is not jarring.


Analogous colour scheme

Analogous colour schemes use colours that are next to each other on the colour wheel. They usually match well and create serene and comfortable designs.

Analogous colour schemes are often found in nature and are harmonious and pleasing to the eye.


Triadic colour scheme 

A triadic colour scheme uses colours that are evenly spaced around the colour
wheel.

Triadic colour schemes tend to be quite vibrant, even if you use pale or unsaturated versions of your hues.


Split-Complementary colour scheme 

The split-complementary colour scheme is a variation of the complementary colour scheme. In addition to the base colour, it uses the two colours adjacent to its complement.

This colour scheme has the same strong visual contrast as the complementary colour scheme, but has less tension.


Rectangle (tetradic) color scheme 

The rectangle or tetradic colour scheme uses four colours arranged into two complementary pairs.
This rich colour scheme offers plenty of possibilities for variation.

Tetradic colour schemes works best if you let one colour be dominant.


Hair up & adding accessories

Hair for fashion and beauty

Using accessories within a Chignon

Products and equipment:
  • Pintail comb
  • Sectioning clips
  • Hair band
  • Hair pins & grips
  • Hairspray
  • Various accessories


Step by step:
  1. Section the hair with two front sections, either with a side or middle parting – depending on
     your preference. Leave the back section.
  2. With the back section of hair create a smooth low ponytail with your hair band.
  3. Begin back combing the ponytail with your pintail comb, this will then create texture and shape into this section. You should then fold the hair upwards and inwards to create the chignon shape. You should use hair grips to gold the hair in place. The shape of the chignon should be smooth.
  4. You can then experiment with the front sections and use accessories in the hair to create different feels to the hairstyle.
  5. When the desired hair style is completed use hair spray to finish.


While playing around with the two front sections I decided to create a 50’s roll and pin curl details in the back of the hair. I also used some twisting and plaiting in these sections and applied different accessories.


Shapes and silhouettes

Hair for fashion and beauty

How to create sleek hairstyles appropriate for the catwalk.

Straight blow dry

When wanting to create a straight blow dry you should take into consideration the type and condition of your clients/models hair. Afro and curly hair will need to be dried with a hotter settings of the dryer. Hair that is naturally fairly straight or has a natural wave will not necessarily need as much heat to change the hair. 


Products and equipment:

  • Heat protection spray
  • Denman D14 styling brush
  • Hair dryer with nozzle
  • Large round ventilation brush
  • Paddle brush
  • Sectioning clips
  • Hair serum


The hair must be freshly washed and then towel dried or sprayed down with water. Before drying the hair in smaller sections you should ensure that the hair is 90% dry. If needed you can give the hair a blast with the hair dryer without the nozzle to remove most of the moisture form the hair. If the hair has damaged ends you should avoid using heat on these areas.

Step by step:

  1. Spray heat protection spray into the hair.
  2. Section the hair into small sections working from the bottom.
  3. Use your round ventilation brush to drape a small section of hair over the top of it and then work the dryer through the hair downwards with the brush. Angle the dryer down the hair shaft for a smoother finish. Ensure that the roots are dry before working down the hair. You should hold the brush straight to achieve straight ends.
  4. Repeat working down this section of hair until the hair is dry.
  5. Once this section of hair is dry you can take another section of hair down and repeat these steps until the hair is dry. You can use the Denman D14 brush once you reach the top sections of hair to pull the hair straight up from the root to ensure there are no kinks in the hair. You should then use the round brush as needed.
  6. If you are fining it difficult to straighten the ends of the hair with the hair dryer you can use a paddle brush to straighten out the ends of the hair.
  7. Apply hair serum to the hair to add shine and keep the hair smooth.
My straight blow dry creating in a practical session
Sleek ponytail

After I had blow dried the hair straight I decided to create a sleek pony tail, this is a high fashion hair style that is often walked down the catwalk.

To create this look I needed:

  • A hairband
  • a pintail comb
To create this look I brushed all the hair back/up onto the crown of the head and used a hair band to secure the hair in place.


Volume at top of hair with sleek back and sides

To create this look I needed:
  • A pintail comb
  • 4 hair grips
  • Hairspray

In the practical session I then created this hair style. I backcombed the top section with a pintail comb and then brushed and griped the side sections underneath the top section of hair. I then smoothed the back combed section back smoothly over.


50's hair with volume and lift

Hair for fashion and beauty

Creating 50's hair with volume!

The 50's is definitely my fave era in terms of makeup and hair fashions. 50's hair had lots of curls with volume and victory rolls! 

Products and equipment:

  • Heat protection spray
  • Hot heated rollers & clips
  • Gel spray
  • Pintail comb
  • Vitapointe
  • Pins & grips
  • Wide tooth comb
  • Hair spray
To create victory rolls in the hair the hair should be dry and clean. If needed you can use dry shampoo to make the hair easier to back comb to give the hair style more structure. To create this hair style the hair should ALWAYS be rolled over the roller.

When setting the hair in the heated rollers to create this type of hair style it is important to take neat sections of hair and to also place each roller in the hair in the right direction. 

Step by step:
  1. Spray the hair with heat protection spray.
  2. Section the hair with a wide side parting. The parting going from the end of the eye brow.
    Leave the rest of the hair as one big section. 
  3. With the big side section use the biggest heated rollers you have to roll the hair over each roller. Begin from the front of the hair line, spray gel spray through the lengths of the hair to achieve more structured curls. Repeat this step throughout this section of hair. You can use a few smaller rollers in this section as you get further back. 
  4. On the other side section around the face place one big roller vertically into this section.Spray the gel spray through the lengths of the hair. This section of hair should also be over the top of the roller.
  5. When you reach the back section you should apply the rollers as brick work over the hair. 
  6. Allow the hair to cool before removing the heated rollers.
  7. Begin removing the rollers and styling from the hair line again. You should use your pin tail comb to backcomb sections of hair in the big front section to give the hair a bit more structure. You can apply Vitapointe to this section of hair to make the hair easier to work with then smooth the hair with the pintail comb and create the victory roll shape using your hand to support the structure. You can then use hair pins and grips to hold the victory roll in place.
  8. Then remove all the other rollers from the hair and smooth some Vitapointe into the hair to smooth the hair out slightly. Grip the other side section of hair backwards of the face. You should then use a wide tooth comb to break the curls up to look more natural.
  9. Spray the hair with hairspray to finish.